So I knew this was going to be a labour of love but this has gone on for a fair old time!

I have a number of projects on the go at any one time, its how I stay both attached and not overly attached. This project however doesn’t seem to have a clear end-date, due to my own dragging of heels. In theory, with drying times permitting, this could all have been completed within a matter of weeks.
Experimenting, and unfamiliar work however has meant that this is now into the 3rd-ish month of me having a play. So, I’m at least near the finish with weathering and details.
So the overbrushing across the whole board brought the nice dark tone that I wanted, more apocalyptic post-nuclear than ice-fresh with Father Christmas, the next steps were to work out what I wanted to have across all my craters.

That meant inspiration for what the end result would be, something to match the bleak nature of the battlefield already. I didn't want the battlefield to be a recent conquest, with blood fresh and corpses pregnant. I want silence. Stillness. I want no wind, I want it apparent that something left this place.
So, no bodies. No blood. No snow banks.
The only real colour I wanted was in the elements that were fixed. So the bits of piping sticking out, the buildings that I would add.
And then on to the craters. These started as a way to add some terrain height to the flatter areas of the board, but I found some crazy pictures online that made me want to give these some real colour and depth.
It kind of started with this picture of an iron mine run-off. I really liked the colour contrast between the deep water and shallow, purely based on the suspended elements in the water.
That made me think; would the contaminants dropped in the course of a 30k battle not corrupt into something other than water?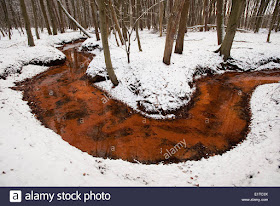

I’ve got 4 and 1/3 boards, all have craters or water somewhere on them, some have larger craters and some have smaller elements, but across the board(s) they are everywhere.
I know of the existence of the realistic water effects stuff, I've used their product to make icicles and to do interesting things with snow. I wanted a bit more variety than just pools however as I wanted to be able to add depth to tracks, add rivulets down the side of the building and generally use more.
So I started to experiment.
First up, straight up PVA mixed with paint. I used various sequential colours to add as much colour to the pools as possible.

After that, I added some colour to some water, and mixed/blotted it through the pools.
Some leaked. Most took an age to dry.

Then I wanted to add the watery effect that I wanted. I inherited a lot of old tins of paint when we bought our house, and I found this stuff.
Hardwearing good. Gloss, good! Clear, very good!

On that goes in a test area. Well, its mostly clear.
Ok brownish I can work with.

So this was added directly to the craters without any colour added, but age has clearly done its work on this stuff. Oh well, its all good. Looks more like murky crater water day by day.
I did underestimate how much I would need, even after starting this stuff off with lots of PVA.

Ok, more of the similar. So this time around I looked for a more clear version of the resin, and this gave a bit more of a cracked surface effect.
Spread it around a bit more. Yep, looks good.
Now there was still more work left over, I need to paint all the small bits of detail like the corrugated metals, pipes, add graffiti maybe and some weathering but I wanted to get a game in to see how this thing worked practically.

Now onto putting it all together and having a look.
The boards did slot together nicely, for the most part. I'll ensure the support of a friend before assembling myself to get them to slot together more readily but that definitely ticked the 'as few seams whilst being transportable' issue.
I threw on some of my existing terrain that i'd build for some height.

Well, I think it looks cool.

Cold and barren, not frosty and twinkly.
At the angle you see the board the pools don't reveal too much, they sit well in the terrain. I think the level at which the water was made was right, but i might still add another layer to the largest ones.

The colours add interest without detracting from the overall effect.
So on to a game, a decent sized one!

We pitted Ultramarines vs Sons of Horus at 6500 points. We made it through a couple of turns.
The height was a great benefit to theming the board, but didn't overrule it all. We went for relatively safe long board edge deployment due to the width of the thing.

The field was good, some sections were better than the others, the trench system was good for infantry but I will need to make more at some point as it was fairly isolated by itself.
Dice rolling was useful doing inside the flatter craters too.
All in all, I'm pretty happy with this. This was mostly an experiment into what I could do, and the techniques involved.
Now onto other things....like another child! Speak soon maybe...
No comments:
Post a Comment